VVeboTableView源码解析

这次分享一个关于性能优化的源码。

我们知道UITabelView在iOS开发中扮演者举足轻重的角色,因为它是iOS开发中使用频率非常高的控件之一:几乎每个app都离不开它,因此,UITabelView的性能将直接影响这个app的性能。

如果UITabelView里的cell设计的比较简单,那么即使不做相应的优化,对性能的影响也不会很大。

但是,当cell里面涉及到图文混排,cell高度不都相等的设计时,如果不进行一些操作的话,会非常影响性能,甚至会出现卡顿,造成非常不好的用户体验。

最近在看一些iOS性能优化的文章,我找到了VVeboTableView这个框架。严格来说这个不属于框架,而是作者用自己的方式优化UITableView的一个实现。

作者模仿了新浪微博的cell样式,在里面展示了各种微博的cell。虽然样式比较复杂,但是性能却很好:我在我的iphone 4s上进行了Core Animation测试,在滑动的时候帧率没有低于56,而且也没有觉得有半点卡顿,那么他是怎么做到的呢?

看了源码之后,我把作者的思路整理了出来:

下面我就从左到右,从上到下,结合代码来展示一下作者是如何实现每一点的。

1. 减少CPU/GPU计算量

1.1 cell的重用机制

1
2
3
4
5
6
7
8
9
10
11
12
13
- (UITableViewCell *)tableView:(UITableView *)tableView cellForRowAtIndexPath:(NSIndexPath *)indexPath{

//cell重用
VVeboTableViewCell *cell = [tableView dequeueReusableCellWithIdentifier:@"cell"];

if (cell==nil) {
cell = [[VVeboTableViewCell alloc] initWithStyle:UITableViewCellStyleDefault reuseIdentifier:@"cell"];
}

//绘制
[self drawCell:cell withIndexPath:indexPath];
return cell;
}

这部分就不赘述了,相信大家都可以掌握。

1.2 将cell高度和 cell里的控件的frame缓存在model里

这一步我们需要在字典转模型里统一计算(不需要看代码细节,只需要知道这里在模型里保存了需要保存的控件的frame和整个cell的高度即可):

1
2
3
4
5
6
7
8
9
10
11
12
13
14
15
16
17
18
19
20
21
22
23
24
25
26
27
28
29
30
31
32
33
34
35
36
37
38
39
40
41
42
43
44
45
46
47
48
49
50
51
52
53
54
55
56
57
58
59
60
61
62
- (void)loadData{
...
for (NSDictionary *dict in temp) {

NSDictionary *user = dict[@"user"];

...

NSDictionary *retweet = [dict valueForKey:@"retweeted_status"];

if (retweet) {

NSMutableDictionary *subData = [NSMutableDictionary dictionary];
...
{
float width = [UIScreen screenWidth]-SIZE_GAP_LEFT*2;
CGSize size = [subData[@"text"] sizeWithConstrainedToWidth:width fromFont:FontWithSize(SIZE_FONT_SUBCONTENT) lineSpace:5];
NSInteger sizeHeight = (size.height+.5);
subData[@"textRect"] = [NSValue valueWithCGRect:CGRectMake(SIZE_GAP_LEFT, SIZE_GAP_BIG, width, sizeHeight)];
sizeHeight += SIZE_GAP_BIG;
if (subData[@"pic_urls"] && [subData[@"pic_urls"] count]>0) {
sizeHeight += (SIZE_GAP_IMG+SIZE_IMAGE+SIZE_GAP_IMG);
}
sizeHeight += SIZE_GAP_BIG;
subData[@"frame"] = [NSValue valueWithCGRect:CGRectMake(0, 0, [UIScreen screenWidth], sizeHeight)];
}

data[@"subData"] = subData;


float width = [UIScreen screenWidth]-SIZE_GAP_LEFT*2;
CGSize size = [data[@"text"] sizeWithConstrainedToWidth:width fromFont:FontWithSize(SIZE_FONT_CONTENT) lineSpace:5];
NSInteger sizeHeight = (size.height+.5);
...
sizeHeight += SIZE_GAP_TOP+SIZE_AVATAR+SIZE_GAP_BIG;
if (data[@"pic_urls"] && [data[@"pic_urls"] count]>0) {
sizeHeight += (SIZE_GAP_IMG+SIZE_IMAGE+SIZE_GAP_IMG);


NSMutableDictionary *subData = [data valueForKey:@"subData"];

if (subData) {
sizeHeight += SIZE_GAP_BIG;
CGRect frame = [subData[@"frame"] CGRectValue];
...
sizeHeight += frame.size.height;
data[@"subData"] = subData;
}

sizeHeight += 30;
data[@"frame"] = [NSValue valueWithCGRect:CGRectMake(0, 0, [UIScreen screenWidth], sizeHeight)];
}
[datas addObject:data];
}
}

//获取高度缓存
- (CGFloat)tableView:(UITableView *)tableView heightForRowAtIndexPath:(NSIndexPath *)indexPath{
NSDictionary *dict = datas[indexPath.row];
float height = [dict[@"frame"] CGRectValue].size.height;
return height;
}

这里我们可以看到,作者根据帖子类型的不同:原贴(subData)的存在与否),来逐渐叠加cell的高度。

而缓存的控件的frame,我们在下面讲解绘制cell的代码里详细介绍。

1.3 减少cell内部控件的层级

我们先来看一下一个带有原贴的转发贴的布局:

布局

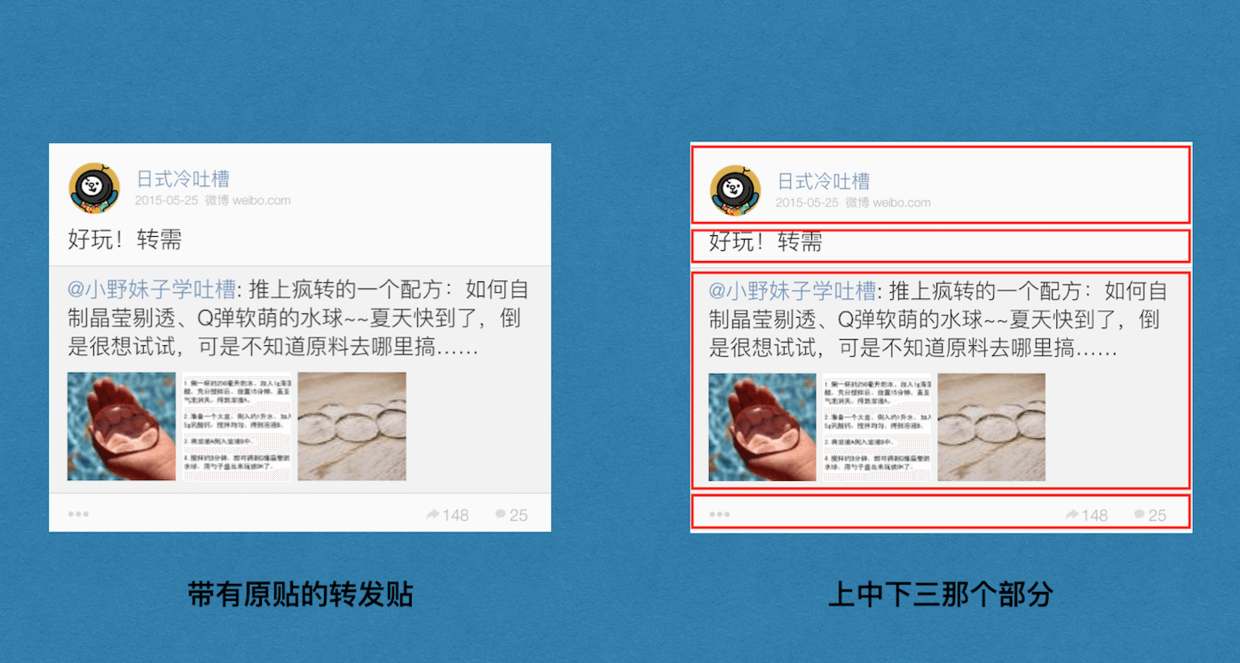
可能有小伙伴会将上中下这三个部分各自封装成一个view,再通过每个view来管理各自的子view。但是这个框架的作者却将它们都排列到一层上。

减少了子view的层级,有助于减少cpu对各种约束的计算。这在子view的数量,层级都很多的情况下对cpu的压力会减轻很多。

1.4 通过覆盖圆角图片来实现头像的圆角效果

1
2
3
4
5
6
7
8
9
10
11
12
13
14
//头像,frame固定
avatarView = [UIButton buttonWithType:UIButtonTypeCustom];//[[VVeboAvatarView alloc] initWithFrame:avatarRect];
avatarView.frame = CGRectMake(SIZE_GAP_LEFT, SIZE_GAP_TOP, SIZE_AVATAR, SIZE_AVATAR);
avatarView.backgroundColor = [UIColor colorWithRed:250/255.0 green:250/255.0 blue:250/255.0 alpha:1];
avatarView.hidden = NO;
avatarView.tag = NSIntegerMax;
avatarView.clipsToBounds = YES;
[self.contentView addSubview:avatarView];
//覆盖在头像上面的图片,制造圆角效果:frame
cornerImage = [[UIImageView alloc] initWithFrame:CGRectMake(0, 0, SIZE_AVATAR+5, SIZE_AVATAR+5)];
cornerImage.center = avatarView.center;
cornerImage.image = [UIImage imageNamed:@"corner_circle@2x.png"];
cornerImage.tag = NSIntegerMax;
[self.contentView addSubview:cornerImage];

在这里,作者没有使用任何复杂的技术来实现图片的圆角(使用layer或者裁剪图片),只是将一张圆角颜色和cell背景色一致的图片覆盖在了原来的头像上,实现了圆角的效果(但是这个方法不太适用于有多个配色方案的app)。

2. 按需加载cell

上文提到过,UITableView持有一个needLoadArr数组,它保存着需要刷新的cell的NSIndexPath

我们先来看一下needLoadArr是如何使用的:

2.1 在cellForRow:方法里只加载可见cell

1
2
3
4
5
6
7
8
9
10
11
12
13
14
15
16
17
18
19
20
21
22
- (UITableViewCell *)tableView:(UITableView *)tableView cellForRowAtIndexPath:(NSIndexPath *)indexPath{
...
[self drawCell:cell withIndexPath:indexPath];
...
}
- (void)drawCell:(VVeboTableViewCell *)cell withIndexPath:(NSIndexPath *)indexPath{

NSDictionary *data = [datas objectAtIndex:indexPath.row];
...
cell.data = data;
//当前的cell的indexPath不在needLoadArr里面,不用绘制
if (needLoadArr.count>0&&[needLoadArr indexOfObject:indexPath]==NSNotFound) {
[cell clear];
return;
}
//将要滚动到顶部,不绘制
if (scrollToToping) {
return;
}
//真正绘制cell的代码
[cell draw];
}

2.2 监听tableview的快速滚动,保存目标滚动范围的前后三行的索引

知道了如何使用needLoadArr,我们看一下needLoadArr里面的元素师如何添加和删除。

添加元素NSIndexPath

1
2
3
4
5
6
7
8
9
10
11
12
13
14
15
16
17
18
19
20
21
22
23
24
25
26
27
28
29
30
31
32
33
34
35
36
37
38
39
40
41
42
43
44
45
46
//按需加载 - 如果目标行与当前行相差超过指定行数,只在目标滚动范围的前后指定3行加载。
- (void)scrollViewWillEndDragging:(UIScrollView *)scrollView withVelocity:(CGPoint)velocity targetContentOffset:(inout CGPoint *)targetContentOffset{

//targetContentOffset : 停止后的contentOffset
NSIndexPath *ip = [self indexPathForRowAtPoint:CGPointMake(0, targetContentOffset->y)];

//当前可见第一行row的index
NSIndexPath *cip = [[self indexPathsForVisibleRows] firstObject];

//设置最小跨度,当滑动的速度很快,超过这个跨度时候执行按需加载
NSInteger skipCount = 8;

//快速滑动(跨度超过了8个cell)
if (labs(cip.row-ip.row)>skipCount) {

//某个区域里的单元格的indexPath
NSArray *temp = [self indexPathsForRowsInRect:CGRectMake(0, targetContentOffset->y, self.width, self.height)];
NSMutableArray *arr = [NSMutableArray arrayWithArray:temp];

if (velocity.y<0) {

//向上滚动
NSIndexPath *indexPath = [temp lastObject];

//超过倒数第3个
if (indexPath.row+3<datas.count) {
[arr addObject:[NSIndexPath indexPathForRow:indexPath.row+1 inSection:0]];
[arr addObject:[NSIndexPath indexPathForRow:indexPath.row+2 inSection:0]];
[arr addObject:[NSIndexPath indexPathForRow:indexPath.row+3 inSection:0]];
}

} else {

//向下滚动
NSIndexPath *indexPath = [temp firstObject];
//超过正数第3个
if (indexPath.row>3) {
[arr addObject:[NSIndexPath indexPathForRow:indexPath.row-3 inSection:0]];
[arr addObject:[NSIndexPath indexPathForRow:indexPath.row-2 inSection:0]];
[arr addObject:[NSIndexPath indexPathForRow:indexPath.row-1 inSection:0]];
}
}
//添加arr里的内容到needLoadArr的末尾
[needLoadArr addObjectsFromArray:arr];
}
}

知道了如何向needLoadArr里添加元素,现在看一下何时(重置)清理这个array:

移除元素NSIndexPath

1
2
3
4
5
6
7
8
9
10
11
12
13
14
15
16
17
18
19
20
21
22
23
24
25
26
27
//用户触摸时第一时间加载内容
- (UIView *)hitTest:(CGPoint)point withEvent:(UIEvent *)event{

if (!scrollToToping) {
[needLoadArr removeAllObjects];
[self loadContent];
}
return [super hitTest:point withEvent:event];
}
- (void)scrollViewWillBeginDragging:(UIScrollView *)scrollView{
[needLoadArr removeAllObjects];
}
//将要滚动到顶部
- (BOOL)scrollViewShouldScrollToTop:(UIScrollView *)scrollView{
scrollToToping = YES;
return YES;
}
//停止滚动
- (void)scrollViewDidEndScrollingAnimation:(UIScrollView *)scrollView{
scrollToToping = NO;
[self loadContent];
}
//滚动到了顶部
- (void)scrollViewDidScrollToTop:(UIScrollView *)scrollView{
scrollToToping = NO;
[self loadContent];
}

我们可以看到,当手指触碰到tableview时 和 开始拖动tableview的时候就要清理这个数组。

而且在手指触碰到tableview时和 tableview停止滚动后就会执行loadContent方法,用来加载可见区域的cell。

loadContent方法的具体实现:

1
2
3
4
5
6
7
8
9
10
11
12
13
14
15
16
17
18
19
20
- (void)loadContent{

//正在滚动到顶部
if (scrollToToping) {
return;
}

//可见cell数
if (self.indexPathsForVisibleRows.count<=0) {
return;
}

//触摸的时候刷新可见cell
if (self.visibleCells&&self.visibleCells.count>0) {
for (id temp in [self.visibleCells copy]) {
VVeboTableViewCell *cell = (VVeboTableViewCell *)temp;
[cell draw];
}
}
}

在这里注意一下,tableview的visibleCells属性是可见的cell的数组。

3. 异步处理cell

在讲解cell是如何显示出来之前,我们大致看一下这个cell都有哪些控件:

控件名称

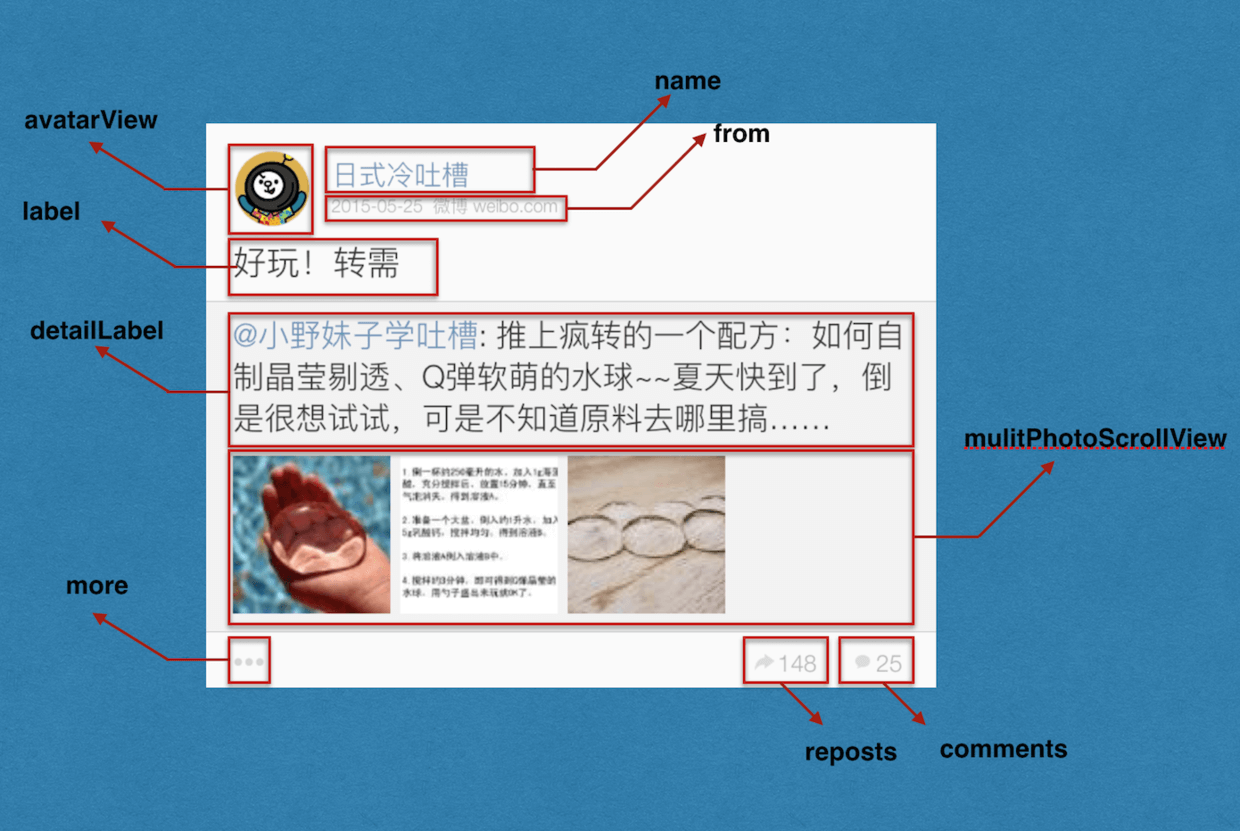
了解到控件的名称,位置之后,我们看一下作者是如何布局这些控件的:

控件布局

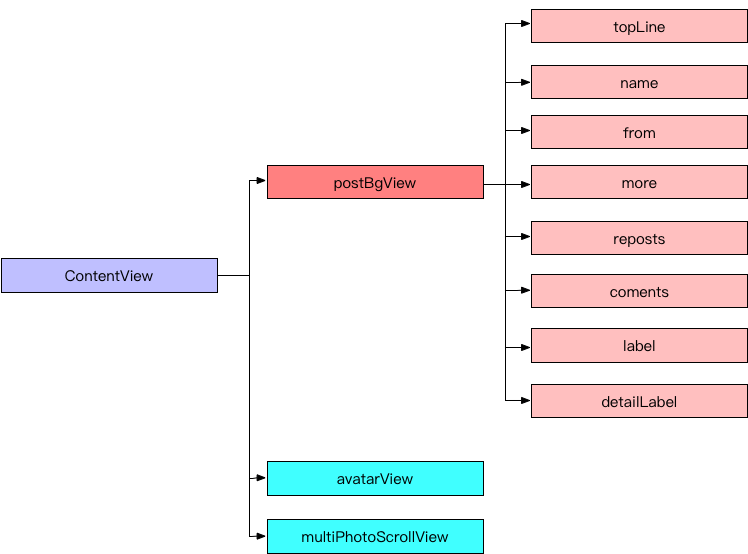
在上面可以大致看出来,除了需要异步网络加载的头像(avatarView)和帖子图片(multiPhotoScrollView),作者都将这些控件画在了一张图上面(postBgView)。

而且我们可以看到,在postBgView上面需要异步显示的内容分为四种:

  1. UIImageView:本地图片(comments, more,reposts)。
  2. UIView:背景,分割线(topLine)。
  3. NSString:name,from字符串。
  4. Label:原贴的detailLabel 和 当前贴的 label。

下面结合代码来讲解这四种绘制:

首先看一下cell内部的核心绘制方法:

现在我们来看一下cell绘制的核心方法,draw方法:

1
2
3
4
5
6
7
8
9
10
11
12
13
14
15
16
17
18
19
20
21
22
23
24
25
26
27
28
29
30
31
32
33
34
35
36
37
38
39
40
41
42
43
44
45
46
47
48
49
50
51
52
53
54
55
56
57
58
59
60
61
62
63
64
65
66
67
68
69
70
71
72
73
74
75
76
77
78
79
80
81
82
83
84
85
86
87
88
89
90
91
92
93
94
95
96
97
98
99
100
101
102
103
104
105
106
107
108
109
110
111
112
113
114
115
116
117
118
119
120
121
122
123
124
125
126
127
128
129
130
131
132
133
134
135
136
137
138
139
140
141
142
143
//将cell的主要内容绘制到图片上
- (void)draw{

//drawed = YES说明正在绘制,则立即返回。因为绘制是异步的,所以在开始绘制之后需要立即设为yes,防止重复绘制
if (drawed) {
return;
}

//标记当前的绘制
NSInteger flag = drawColorFlag;

drawed = YES;

dispatch_async(dispatch_get_global_queue(DISPATCH_QUEUE_PRIORITY_DEFAULT, 0), ^{

//获取整个cell的frame,已经换存在模型里了
CGRect rect = [_data[@"frame"] CGRectValue];

//开启图形上下文
UIGraphicsBeginImageContextWithOptions(rect.size, YES, 0);

//获取图形上下文
CGContextRef context = UIGraphicsGetCurrentContext();

//背景颜色
[[UIColor colorWithRed:250/255.0 green:250/255.0 blue:250/255.0 alpha:1] set];

//通过rect填充背景颜色
CGContextFillRect(context, rect);

//如果有原帖(说明当前贴是转发贴)
if ([_data valueForKey:@"subData"]) {

[[UIColor colorWithRed:243/255.0 green:243/255.0 blue:243/255.0 alpha:1] set];
CGRect subFrame = [_data[@"subData"][@"frame"] CGRectValue];
CGContextFillRect(context, subFrame);

//原帖上面的分割线
[[UIColor colorWithRed:200/255.0 green:200/255.0 blue:200/255.0 alpha:1] set];
CGContextFillRect(context, CGRectMake(0, subFrame.origin.y, rect.size.width, .5));
}

{
float leftX = SIZE_GAP_LEFT+SIZE_AVATAR+SIZE_GAP_BIG;
float x = leftX;
float y = (SIZE_AVATAR-(SIZE_FONT_NAME+SIZE_FONT_SUBTITLE+6))/2-2+SIZE_GAP_TOP+SIZE_GAP_SMALL-5;

//绘制名字
[_data[@"name"] drawInContext:context withPosition:CGPointMake(x, y) andFont:FontWithSize(SIZE_FONT_NAME)
andTextColor:[UIColor colorWithRed:106/255.0 green:140/255.0 blue:181/255.0 alpha:1]
andHeight:rect.size.height];

//绘制名字下面的info
y += SIZE_FONT_NAME+5;
float fromX = leftX;
float size = [UIScreen screenWidth]-leftX;
NSString *from = [NSString stringWithFormat:@"%@ %@", _data[@"time"], _data[@"from"]];

[from drawInContext:context withPosition:CGPointMake(fromX, y) andFont:FontWithSize(SIZE_FONT_SUBTITLE)
andTextColor:[UIColor colorWithRed:178/255.0 green:178/255.0 blue:178/255.0 alpha:1]
andHeight:rect.size.height andWidth:size];
}

{

//评论角
CGRect countRect = CGRectMake(0, rect.size.height-30, [UIScreen screenWidth], 30);
[[UIColor colorWithRed:250/255.0 green:250/255.0 blue:250/255.0 alpha:1] set];
CGContextFillRect(context, countRect);
float alpha = 1;

float x = [UIScreen screenWidth]-SIZE_GAP_LEFT-10;
NSString *comments = _data[@"comments"];
if (comments) {
CGSize size = [comments sizeWithConstrainedToSize:CGSizeMake(CGFLOAT_MAX, CGFLOAT_MAX) fromFont:FontWithSize(SIZE_FONT_SUBTITLE) lineSpace:5];

x -= size.width;

//图片文字
[comments drawInContext:context withPosition:CGPointMake(x, 8+countRect.origin.y)
andFont:FontWithSize(12)
andTextColor:[UIColor colorWithRed:178/255.0 green:178/255.0 blue:178/255.0 alpha:1]
andHeight:rect.size.height];

//评论图片(bundle里的图片)
[[UIImage imageNamed:@"t_comments.png"] drawInRect:CGRectMake(x-5, 10.5+countRect.origin.y, 10, 9) blendMode:kCGBlendModeNormal alpha:alpha];

commentsRect = CGRectMake(x-5, self.height-50, [UIScreen screenWidth]-x+5, 50);
x -= 20;
}

//转发角
NSString *reposts = _data[@"reposts"];
if (reposts) {
CGSize size = [reposts sizeWithConstrainedToSize:CGSizeMake(CGFLOAT_MAX, CGFLOAT_MAX) fromFont:FontWithSize(SIZE_FONT_SUBTITLE) lineSpace:5];

x -= MAX(size.width, 5)+SIZE_GAP_BIG;

//转发文字
[reposts drawInContext:context withPosition:CGPointMake(x, 8+countRect.origin.y)
andFont:FontWithSize(12)
andTextColor:[UIColor colorWithRed:178/255.0 green:178/255.0 blue:178/255.0 alpha:1]

andHeight:rect.size.height];

//转发图片(bundle里的图片)
[[UIImage imageNamed:@"t_repost.png"] drawInRect:CGRectMake(x-5, 11+countRect.origin.y, 10, 9) blendMode:kCGBlendModeNormal alpha:alpha];
repostsRect = CGRectMake(x-5, self.height-50, commentsRect.origin.x-x, 50);
x -= 20;
}

//更多角
[@"•••" drawInContext:context
withPosition:CGPointMake(SIZE_GAP_LEFT, 8+countRect.origin.y)
andFont:FontWithSize(11)
andTextColor:[UIColor colorWithRed:178/255.0 green:178/255.0 blue:178/255.0 alpha:.5]
andHeight:rect.size.height];

//绘制原帖底部的分割线
if ([_data valueForKey:@"subData"]) {
[[UIColor colorWithRed:200/255.0 green:200/255.0 blue:200/255.0 alpha:1] set];
CGContextFillRect(context, CGRectMake(0, rect.size.height-30.5, rect.size.width, .5));
}
}

//将整个contex转化为图片,赋给背景imageview
UIImage *temp = UIGraphicsGetImageFromCurrentImageContext();
UIGraphicsEndImageContext();
dispatch_async(dispatch_get_main_queue(), ^{
if (flag==drawColorFlag) {
postBGView.frame = rect;
postBGView.image = nil;
postBGView.image = temp;
}
});
});

//绘制两个label的text
[self drawText];

//加载帖子里的网路图片,使用SDWebImage
[self loadThumb];
}

下面抽出每一种绘制内容的代码,分别讲解:

3.1 异步加载网络图片

关于网络图片的异步加载和缓存,作者使用了第三方框架:SDWebImage

1
2
3
4
5
6
7
8
- (void)setData:(NSDictionary *)data{
_data = data;
[avatarView setBackgroundImage:nil forState:UIControlStateNormal];
if ([data valueForKey:@"avatarUrl"]) {
NSURL *url = [NSURL URLWithString:[data valueForKey:@"avatarUrl"]];
[avatarView sd_setBackgroundImageWithURL:url forState:UIControlStateNormal placeholderImage:nil options:SDWebImageLowPriority];
}
}

对于SDWebImage,我相信大家都不会陌生,我前一阵写了一篇源码解析,有兴趣的话可以看一下:SDWebImage源码解析

3.2 异步绘制本地图片

本地图片的绘制,只需要提供图片在bundle内部的名字和frame就可以绘制:

1
[[UIImage imageNamed:@"t_comments.png"] drawInRect:CGRectMake(x-5, 10.5+countRect.origin.y, 10, 9) blendMode:kCGBlendModeNormal alpha:alpha];

###3.3 异步绘制UIView

对于UIView的绘制,我们只需要知道要绘制的UIView的frame和颜色即可:

1
2
3
4
5
//背景颜色
[[UIColor colorWithRed:250/255.0 green:250/255.0 blue:250/255.0 alpha:1] set];

//通过rect填充背景颜色
CGContextFillRect(context, rect);

讲到现在,就剩下了关于文字的绘制,包括脱离了UILabel的纯文本的绘制和UILabel里文本的绘制,我们先说一下关于简单的纯NSString的绘制:

3.4 异步绘制NSString

作者通过传入字符串的字体,颜色和行高,以及位置就实现了纯文本的绘制:

1
2
3
4
//绘制名字
[_data[@"name"] drawInContext:context withPosition:CGPointMake(x, y) andFont:FontWithSize(SIZE_FONT_NAME)
andTextColor:[UIColor colorWithRed:106/255.0 green:140/255.0 blue:181/255.0 alpha:1]
andHeight:rect.size.height];

这个方法是作者在NSString的一个分类里自定义的,我们看一下它的实现:

1
2
3
4
5
6
7
8
9
10
11
12
13
14
15
16
17
18
19
20
21
22
23
24
25
26
27
28
29
30
31
32
33
34
35
36
37
38
39
40
41
42
43
44
45
46
47
48
49
50
51
52
53
54
55
56
57
58
59
60
61
62
63
64
65
66
67
- (void)drawInContext:(CGContextRef)context withPosition:(CGPoint)p andFont:(UIFont *)font andTextColor:(UIColor *)color andHeight:(float)height andWidth:(float)width{    
CGSize size = CGSizeMake(width, font.pointSize+10);
CGContextSetTextMatrix(context,CGAffineTransformIdentity);
//移动坐标系统,所有点的y增加了height
CGContextTranslateCTM(context,0,height);

//缩放坐标系统,所有点的x乘以1.0,所有的点的y乘以-1.0
CGContextScaleCTM(context,1.0,-1.0);

//文字颜色
UIColor* textColor = color;

//生成CTFont
CTFontRef font1 = CTFontCreateWithName((__bridge CFStringRef)font.fontName, font.pointSize,NULL);

//用于创建CTParagraphStyleRef的一些基本数据
CGFloat minimumLineHeight = font.pointSize,maximumLineHeight = minimumLineHeight+10, linespace = 5;
CTLineBreakMode lineBreakMode = kCTLineBreakByTruncatingTail;

//左对齐
CTTextAlignment alignment = kCTLeftTextAlignment;

//创建CTParagraphStyleRef
CTParagraphStyleRef style = CTParagraphStyleCreate((CTParagraphStyleSetting[6]){
{kCTParagraphStyleSpecifierAlignment, sizeof(alignment), &alignment},
{kCTParagraphStyleSpecifierMinimumLineHeight,sizeof(minimumLineHeight),&minimumLineHeight},
{kCTParagraphStyleSpecifierMaximumLineHeight,sizeof(maximumLineHeight),&maximumLineHeight},
{kCTParagraphStyleSpecifierMaximumLineSpacing, sizeof(linespace), &linespace},
{kCTParagraphStyleSpecifierMinimumLineSpacing, sizeof(linespace), &linespace},
{kCTParagraphStyleSpecifierLineBreakMode,sizeof(CTLineBreakMode),&lineBreakMode}
},6);
//设置属性字典;对象,key
NSDictionary* attributes = [NSDictionary dictionaryWithObjectsAndKeys:
(__bridge id)font1,(NSString*)kCTFontAttributeName,
textColor.CGColor,kCTForegroundColorAttributeName,
style,kCTParagraphStyleAttributeName,
nil];

//生成path,添加到cgcontex上
CGMutablePathRef path = CGPathCreateMutable();
CGPathAddRect(path,NULL,CGRectMake(p.x, height-p.y-size.height,(size.width),(size.height)));

//生成CF属性字符串
NSMutableAttributedString *attributedStr = [[NSMutableAttributedString alloc] initWithString:self attributes:attributes];
CFAttributedStringRef attributedString = (__bridge CFAttributedStringRef)attributedStr;

//从attributedString拿到ctframesetter
CTFramesetterRef framesetter = CTFramesetterCreateWithAttributedString((CFAttributedStringRef)attributedString);

//从framesetter拿到 core text 的 ctframe
CTFrameRef ctframe = CTFramesetterCreateFrame(framesetter, CFRangeMake(0,CFAttributedStringGetLength(attributedString)),path,NULL);

//将ctframe绘制到context里面
CTFrameDraw(ctframe,context);

//因为不是对象类型,需要释放
CGPathRelease(path);
CFRelease(font1);
CFRelease(framesetter);
CFRelease(ctframe);
[[attributedStr mutableString] setString:@""];

//恢复context坐标系统
CGContextSetTextMatrix(context,CGAffineTransformIdentity);
CGContextTranslateCTM(context,0, height);
CGContextScaleCTM(context,1.0,-1.0);
}

在这里,作者根据文字的起点,颜色,字体大小和行高,使用Core Text,将文字绘制在了传入的context上面。

3.5 异步绘制UILabel

而对于UILabel里面的绘制,作者也采取了类似的方法:

首先看一下在cell实现文件里,关于绘制label文字方法的调用:

1
2
3
4
5
6
7
8
9
10
11
12
13
14
15
16
17
18
19
20
21
22
//将文本内容绘制到图片上,也是异步绘制
- (void)drawText{

//如果发现label或detailLabel不存在,则重新add一次
if (label==nil||detailLabel==nil) {
[self addLabel];
}

//传入frame
label.frame = [_data[@"textRect"] CGRectValue];
//异步绘制text
[label setText:_data[@"text"]];

//如果存在原帖
if ([_data valueForKey:@"subData"]) {

detailLabel.frame = [[_data valueForKey:@"subData"][@"textRect"] CGRectValue];
//异步绘制text
[detailLabel setText:[_data valueForKey:@"subData"][@"text"]];
detailLabel.hidden = NO;
}
}

可以看出,对于帖子而言,是否存在原贴(当前贴是否是转发贴)是不固定的,所以需要在判断之后,用hidden属性来控制相应控件的隐藏和显示,而不是用addSubView的方法。

这里的label是作者自己封装的VVeboLabel。它具有高亮显示点击,利用正则表达式区分不同类型的特殊文字(话题名,用户名,网址,emoji)的功能。

简单介绍一下这个封装好的label:

  • 继承于UIView,可以响应用户点击,在初始化之后,_textAlignment,_textColor,_font,_lienSpace属性都会被初始化。
  • 使用Core Text绘制文字。
  • 持有两种UIImageView,用来显示默认状态和高亮状态的图片(将字符串绘制成图片)。
  • 保存了四种特殊文字的颜色,用正则表达式识别以后,给其着色。

这里讲一下这个label的setText:方法:

1
2
3
4
5
6
7
8
9
10
11
12
13
14
15
16
17
18
19
20
21
22
23
24
25
26
27
28
29
30
31
32
33
34
35
36
37
38
39
40
41
42
43
44
45
46
47
48
49
50
51
52
53
54
55
56
57
58
59
60
61
62
63
64
65
66
67
68
69
70
71
72
73
74
75
76
77
78
79
80
81
82
83
84
85
86
87
88
89
90
91
92
93
94
95
96
97
98
99
100
101
102
103
104
105
106
107
108
109
110
111
112
113
114
115
116
117
118
119
120
121
122
123
124
125
126
127
//使用coretext将文本绘制到图片。
- (void)setText:(NSString *)text{

//labelImageView 普通状态时的imageview
//highlightImageView 高亮状态时的iamgeview

...

//绘制标记,初始化时赋一个随机值;clear之后更新一个随机值
NSInteger flag = drawFlag;

//是否正在高亮(在点击label的时候设置为yes,松开的时候设置为NO)
BOOL isHighlight = highlighting;

dispatch_async(dispatch_get_global_queue(DISPATCH_QUEUE_PRIORITY_DEFAULT, 0), ^{

NSString *temp = text;
_text = text;
CGSize size = self.frame.size;
size.height += 10;

UIGraphicsBeginImageContextWithOptions(size, ![self.backgroundColor isEqual:[UIColor clearColor]], 0);
CGContextRef context = UIGraphicsGetCurrentContext();
if (context==NULL) {
return;
}

if (![self.backgroundColor isEqual:[UIColor clearColor]]) {
[self.backgroundColor set];
CGContextFillRect(context, CGRectMake(0, 0, size.width, size.height));
}

CGContextSetTextMatrix(context,CGAffineTransformIdentity);
CGContextTranslateCTM(context,0,size.height);
CGContextScaleCTM(context,1.0,-1.0);

//Determine default text color
UIColor* textColor = self.textColor;

//Set line height, font, color and break mode
CGFloat minimumLineHeight = self.font.pointSize,maximumLineHeight = minimumLineHeight, linespace = self.lineSpace;

CTFontRef font = CTFontCreateWithName((__bridge CFStringRef)self.font.fontName, self.font.pointSize,NULL);
CTLineBreakMode lineBreakMode = kCTLineBreakByWordWrapping;
CTTextAlignment alignment = CTTextAlignmentFromUITextAlignment(self.textAlignment);
//Apply paragraph settings
CTParagraphStyleRef style = CTParagraphStyleCreate((CTParagraphStyleSetting[6]){
{kCTParagraphStyleSpecifierAlignment, sizeof(alignment), &alignment},
{kCTParagraphStyleSpecifierMinimumLineHeight,sizeof(minimumLineHeight),&minimumLineHeight},
{kCTParagraphStyleSpecifierMaximumLineHeight,sizeof(maximumLineHeight),&maximumLineHeight},
{kCTParagraphStyleSpecifierMaximumLineSpacing, sizeof(linespace), &linespace},
{kCTParagraphStyleSpecifierMinimumLineSpacing, sizeof(linespace), &linespace},
{kCTParagraphStyleSpecifierLineBreakMode,sizeof(CTLineBreakMode),&lineBreakMode}
},6);

//属性字典
NSDictionary* attributes = [NSDictionary dictionaryWithObjectsAndKeys:(__bridge id)font,(NSString*)kCTFontAttributeName,
textColor.CGColor,kCTForegroundColorAttributeName,
style,kCTParagraphStyleAttributeName,
nil];

//拿到CFAttributedStringRef
NSMutableAttributedString *attributedStr = [[NSMutableAttributedString alloc] initWithString:text attributes:attributes];
CFAttributedStringRef attributedString = (__bridge CFAttributedStringRef)[self highlightText:attributedStr];

//根据attributedStringRef 获取CTFramesetterRef
CTFramesetterRef framesetter = CTFramesetterCreateWithAttributedString((CFAttributedStringRef)attributedString);

CGRect rect = CGRectMake(0, 5,(size.width),(size.height-5));

if ([temp isEqualToString:text]) {

//根据 framesetter 和 attributedString 绘制text
[self drawFramesetter:framesetter attributedString:attributedStr textRange:CFRangeMake(0, text.length) inRect:rect context:context];

//恢复context
CGContextSetTextMatrix(context,CGAffineTransformIdentity);
CGContextTranslateCTM(context,0,size.height);
CGContextScaleCTM(context,1.0,-1.0);

//截取当前图片
UIImage *screenShotimage = UIGraphicsGetImageFromCurrentImageContext();
UIGraphicsEndImageContext();

dispatch_async(dispatch_get_main_queue(), ^{

CFRelease(font);
CFRelease(framesetter);
[[attributedStr mutableString] setString:@""];

if (drawFlag==flag) {

if (isHighlight) {

//高亮状态:把图片付给highlightImageView
if (highlighting) {
highlightImageView.image = nil;
if (highlightImageView.width!=screenShotimage.size.width) {
highlightImageView.width = screenShotimage.size.width;
}
if (highlightImageView.height!=screenShotimage.size.height) {
highlightImageView.height = screenShotimage.size.height;
}
highlightImageView.image = screenShotimage;
}

} else {

//非高亮状态,把图片付给labelImageView
if ([temp isEqualToString:text]) {
if (labelImageView.width!=screenShotimage.size.width) {
labelImageView.width = screenShotimage.size.width;
}
if (labelImageView.height!=screenShotimage.size.height) {
labelImageView.height = screenShotimage.size.height;
}
highlightImageView.image = nil;
labelImageView.image = nil;
labelImageView.image = screenShotimage;
}
}
// [self debugDraw];//绘制可触摸区域
}
});
}
});
}

这个被作者封装好的Label里面还有很多其他的方法,比如用正则表达式高亮显示特殊字符串等等。

关于tableView的优化,作者做了很多处理,使得这种显示内容比较丰富的cell在4s真机上好不卡顿,非常值得学习。

————————————————- 2018年7月17日更新 ————————————————-

注意注意!!!

笔者在近期开通了个人公众号,主要分享编程,读书笔记,思考类的文章。

  • 编程类文章:包括笔者以前发布的精选技术文章,以及后续发布的技术文章(以原创为主),并且逐渐脱离 iOS 的内容,将侧重点会转移到提高编程能力的方向上。
  • 读书笔记类文章:分享编程类思考类心理类职场类书籍的读书笔记。
  • 思考类文章:分享笔者平时在技术上生活上的思考。

因为公众号每天发布的消息数有限制,所以到目前为止还没有将所有过去的精选文章都发布在公众号上,后续会逐步发布的。

而且因为各大博客平台的各种限制,后面还会在公众号上发布一些短小精干,以小见大的干货文章哦~

扫下方的公众号二维码并点击关注,期待与您的共同成长~

公众号:程序员维他命

坚持原创技术分享,您的支持将鼓励我继续创作!